Today, we had to bring Joshua's car seat into the NICU, so the nurses could check to see that he fit in it and didn't have any breathing or heart rate issues getting into the car seat. In honor of Joshua passing the car seat test, I thought I would share the details on re-covering my car seat.
I was lucky enough to have been gifted a very nice car seat from a friend who was through having babies. It is a Graco Snug Ride, a style that I really like. The fabric, however, just wasn't my style.
Since the car seat was free, I was OK with investing a little fabric and time in recovering the car seat. I looked at this tutorial for completely dissecting and reassembling a car seat to get an idea of how much fabric to purchase.
When I sat down to start the project I discovered that the plain olive green color of the existing seat matched my new fabrics pretty well. So, I opted not to reinvent the car seat, just to add a few colorful details on top of the existing fabric. I started with the canopy sun cover.
The Graco cover pops off from the car seat very easily at the base of the handle.
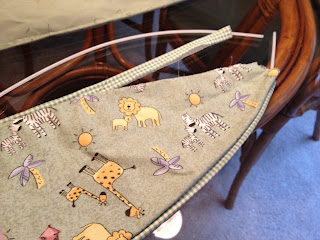
I needed to remove the plastic supports from the front and back of the canopy to be able to sew fabric to it. I opted to undo the seam that held it in place. I discovered later that I could have just bunched up the fabric until the center of the support, where the plastic snaps into two pieces, was visible and unhooked the supports in the middle so that they slid out. I have pictures of that process later, if you want to avoid some wasted time ripping out and then sewing this seam.
Here is the canopy with the supports removed. I could have just sewn one central panel over the animal fabric in the center. Instead, I decided that I wanted to replace all three panels of the canopy so I took apart the seams.
There are small plastic supports between each panel. I chose to recover these also. Just open up the seams and save the pieces to be a pattern for the new fabric.
Here is the central panel being re-cut in the new fabric.
First I sewed the strips of fabric to the edges of the central panel.
Line up the edge of the front panel with one edge of the central panel and sew. Do the same with the back panel.
Either sew the front and back support into the pocket you took apart, or slide half of the support into the sewn pocket and connect the other half from the other side. Insert the smaller supports on either side of the central panel and add bias tape trim to hold everything in place.
The canopy is finished!
The actual seat cover was a plain olive green and could have remained untouched, but I had enough fabric to do a simple stripe down the back.
I cut a rectangle to line up with the side seams of the seat cover. I undid the top and bottom seams at the edge of the seat an slid the rectangle through the opening. First I turned under the edges of the rectangle and sewed them to the back of the seat cover. Then I re-sewed the top and bottom seam of the edge of the seat and trimmed the extra. The only thing left to do was sew around the openings for the straps so that I could cut open the holes.
And here is the finished car seat, all ready for Joshua to FINALLY travel home from the hospital!


No comments:
Post a Comment