Thursday, March 29, 2012

Today I will......

Jennifer and I have a tradition of wearing signs when we run our marathons.  It started with an idea that she saw in a book, if you wear your name on the front of your shirt, then some of the spectators will cheer you on by calling your your name!  Somewhere in our training we realized that while the spectators were reading the front our your shirt, the runners were in prime position to read the back of your shirt.  As the appointed sign maker for our group I think I was left to decide on the exact wording.  I wanted our sign to give fellow runners something on which to comment or congratulate us. And so we began wearing signs saying "Today I will FINISH my 1st (or 2nd or 14th) marathon."  We were congratulated and cheered on by runners who passed us and by runners whom we passed.  When we settled into a pace with another runner, we were often coaxed into a conversation about what races we had run.  The sign served it's purpose, and then some.
What I hadn't realized was how much that positive affirmation would end up meaning to me.  Throughout the race, whenever I struggled, there was that positive message on my back (and in my head) that I WOULD finish!  Years later, when planning for the birth of my daughter, I remembered this little trick and made signs for my hospital room stating "Today, I will meet my daughter."  Again, when laboring without medication became difficult, I had that mantra in my head to help me focus on the reason why I was working so hard.  Flash forward 4 years, and today I am heading out of town for what I am sure will be a challenging, but hopefully rewarding opportunity.  Today, I am nervous and excited.  Today I will find it hard to focus and think of creative ideas.... but that is EXACTLY what I am being challenged to do!  So today (and throughout this weekend) I wanted to wear another positive message to help me focus on what is important and accomplish my goals.

I won't be able to wear a sign on my back or to tape messages to the walls.  I had an idea to work a message onto a bracelet.  That way, when I look at my hands (which I tend to do a lot while being crafty) I will at some point catch a glimps of the message on my arm.  Even if I can't read the whole thing, I will know its there and be reminded of what it says.  I was just going to write on a piece of paper and use packing tape to laminate and attach it into a ring, but my sister laughed at how ridiculously un-crafty that sounded. Instead, I found some soft leather cording at the craft store.  I cut a piece that fit around tested out different messages to see how they would fit.  When I was ready, I just used a fine point permanent ink pen to write directly on the leather.  I tested a spot first by getting the ink wet and it didn't run.  It is more permanent than I expected, considering that I was OK with just writing on paper!
I bought some findings from teh jewelry aisle of the craft store.  This one has a loop on one end for a fastener and crimps closed on the other end.  It was PERFECT for finishing off the leather strip.
I used needle nose pliers to bend the metal down over the leather.
Here is the finished end.
And here is the finished bracelet, or at least what I will see of it.  My affirmation for this trip is "Today I will enjoy this amazing opportunity to play."  While I am stressed and watching the clock and worried about a million minute details, I am hopeful that this sign can help me remember that I was chosen and this is a fun and interesting opportunity.  PJ and I get to do something that we enjoy in an area that we have been given talent. AND we get to face this challenge together.  Sorry that I can't go into details about what exactly we are being asked to do.  more information will come eventually, but for now if shouldn't matter as long as I can focus my sign and remember to enjoy the ride!

Tuesday, March 27, 2012

Cover Art

I was asked by a friend if I could help their band with some art for a CD cover.  That kind of thing makes me really nervous as I usually only make art for my own quirky needs. I don't like the pressure of making things that are dictated by others at all.  But, this is the same friend who has taken our Christmas photographs for the last two years, so I couldn't say no.  I explained that I worked best from photos and would need a very clear image of what they wanted.  I also explained that if it wasn't what they wanted, then they needed to be honest about that and we could either keep working at it or they could find a different way to go.
The general idea was an old cowboy sitting at a bar, telling stories.  My friend wanted the old cowboy to be motioning with his hands, like you do when you say "and it was THIS big".  I found a vintage bar image with a bartender to use as the background pretty easily.  I projected that and traced the basic lines.  Finding the old cowboy in the perfect pose to be both at a bar and motioning with his hands proved much more challenging. I found a modern picture of a guy, photographed from the back, resting his elbows on a bar. It was as close as I could find so I projected and traced it.
Many of our conversations revolved around an old cowboy feel, but also sort of an abstract look.  I got an idea to collage some printed paper from an old book onto the picture to give some instant age and texture.  I also chose sepia tones to add to the vintage feel. I also began adjusting the man's arms, but was having to free hand it, so it isn't really worked out yet.
Next I worked in some pastels to darken the values and bring in some details.  I was mostly working from my imagination here, which always makes me less confident.  The arms still weren't right, so my friend took a picture of someone in the pose that he wanted and that helped a lot.
Here is the improved hand gesture with some older cowboy details.  At this point we were getting close.
I added a few more bottles to finish out the background and I was planning to meet up with my friend to discuss if any changes needed to be made.  Unfortunately, that was the day that everyone in my house came down with a stomach virus.  I left the artwork where my friend could easily get it and, not hearing anything else about it, assumed it was workable.
The CD has just been released on the band's website and with it, is the finished cover art!  I hope they like it.  I am not as personally invested in this piece as I usually am in my work, mostly because it wasn't my idea or desire to make it, but I am glad that it worked for them!

Wednesday, March 21, 2012

A Few (Much Needed) Improvements

I had a much needed week off from work last week. It was spring break for my school system, but with temperatures hitting the mid 80's it felt almost like summer vacation!  Lydia still had preschool, so I got 5 blissful days to go on every appointment that teacher's struggle to make during the school day.  I had an ultrasound, saw the optometrist, picked out a new pair of glasses, got a prescription for contacts (and had to wear a pair for the whole week to test the fit), I got my hair cut and colored, I visited the dentist for a broken filling (and got a pricey new crown), I was supposed to go to the ear, nose, and throat doctor but the emergency dental work forced that one cancellation.
It was a VERY busy week!  I had a lot of routine maintenance but EVERYONE is commenting on my hair.  It had definitely gotten too long and I wasn't doing anything with it except pulling it up into a clip.  Also, when I was pregnant with Lydia I started seeing grey hairs pop up EVERYWHERE on my head.  It's not like I don't have any grey hair between pregnancies, but MAN do they show up when I am expecting!  So I went from dull reddish brown/grey hair with no style to this cute cut and some vibrant red color.  It was WAY overdue and I am glad to have had the time to get it done!These pictures are a cropped view of my recent maternity photos.  I never got to a professional photographer while pregnant with Lydia.  I wanted to, but she came so early it just didn't happen.  I did snap one picture of my very full belly in June and I am SO glad I did because I wasn't pregnant much longer. You can see it on my birth story blog post HERE
 So, I woke up on the last day of my spring break with a cute new cut and color.  I had contacts in because of the week long trial for the eye doctor.  I had just unpacked all of my cute maternity clothing from storage and I FINALLY had a belly that looked pregnant and not just overweight.    AND we (PJ and I) just found out the gender of the baby.  We are waiting to tell family until Easter (similar to our Easter gender announcement for Lydia).  Suddenly I realized that if I could get an appointment that same day, I could take a few gender themed maternity photos BEFORE my double chin turned into a triple chin!  I called and got an appointment for two hours later, giving me just enough time to craft up some gender themed photo props. I am SO happy with the pictures and can't wait to share them!  For now you will have to settle for the cute cropped photos above and with the one other much needed improvement for today's post.

I have been trying to figure out how to add "related posts" links to the end of each blog post for a really long time.  I see them on other blogs and then I look in the widgets on blogger and NOTHING!  Today, while trying to find a link to leave a comment on another blog, I accidentally clicked this little "linkwithin" button. I was diverted to a  website all about a FREE widget that automatically scans your blog and suggests similar related posts for each post you look at!  EXACTLY what I wanted and SO EASY to add.  They had step by step directions (with pictures) to make sure you did it right.  So, be sure to scroll to the bottom of this post and check out the recommendations for related topics.  I couldn't be happier....unless it really was summer vacation, instead of just FEELING like it SHOULD be!

Monday, March 19, 2012

Deer Love

One of the things that I am enjoying about this whole blogging process is the opportunity to look back at my own thoughts and creations over a span of time.  Sometimes patterns begin to arise and it is interesting to me to see related ideas evolve.
For example, here is a piece of Anna Maria Horner fabric called Forrest Hills.  I had the pleasure of taking a workshop with AMH three years ago, shortly after Lydia turned one. The workshop was about working fabric onto a canvas and then painting around and often over the fabric so that it becomes an inspiration to the painting.
I arrived at the workshop with the idea of doing something about Dianna, goddess of the hunt, and using fabric that I had left over from Lydia's first birthday dress.  You can see the beginning of my painting above.  Dianna was based on a statue of the goddess at Builtmore Estates in Asheville NC.  Below is a picture of Lydia in the dress that I made for her first birthday.
I started the painting process by gluing (using modge podge) the diamond pattern and butterfly pattern fabric to the canvas.  I then added the image of Dianna on top of the fabric and let the fabric become the background.  I decided that the diamonds looked like chain link fencing so I went with the idea of animals that were separated from this hunter goddess by a fence.  I couldn't decide if it was better to be trapped behind a fence or hunted by a goddess.   In the end, I allowed the chain link to denigrate in some areas of the sky so that the butterflies could be free.  (what kind of a goddess hunts butterflies anyway?) 
So that brought up the question of what exactly was the hunted animal in question.  Anna Maria had brought along some scraps of her newest line of fabric, Little Folks.  I had seen this amazing pattern with deer and houses, but someone else was working with the only scraps of it.  By the time I got pretty far along with my image, though, that person had used what they needed and there was a tiny strip of it available.  It is hard to see, but in the lower right corner of my painting, there is a landscape, partially inspired by the Forest Hills fabric. I can still spot two tiny deer near the horizon.  I'm not sure if Dianna sees them or what she intends to do about them!
Anyways, I got the idea then and there of getting my hands on some of this lovely fabric and making something out of it for my Lydia Diann.  When I came across it in a fabric store, all they had was the pink and orange color way, but I was so excited I didn't care.  I also didn't bother to find a pattern and just bought a random amount.  This is a voile, so it was really soft and sheer, but also really pricey so I didn't buy much, maybe a yard of this pattern and a half yard of a coordinate.
I held onto that fabric for almost a year trying to decide what to make and regretting my impulsive (expensive) purchase. Then I was asked to make a dress for a friend's daughter that basically amounted to three rows of ruffles attached to a sundress bodice.  I realized that I could cut whatever amount of the Forrest Hills fabric I had into strips and then divide up the strips so that the first ruffle row was bigger than the bodice width, the second row was bigger than that, and the third row was the biggest in length, creating a gradually widening skirt.  I forget what my exact measurements were, but it didn't really matter.  It was mostly a math problem to get equal width strips in a number that allowed me to use more length on each row.  I think I had something like 3 fabric lengths on the bottom and 2 in the middle and one length on the top.  Anyway, this dress was the perfect bright flouncy addition to our "Tea for Two" mad hatter themed second birthday party
A few months later, I started work on Lydia's "big girl bedroom". When I painted the landscape on her walls I knew I needed to paint some living creatures in all of that land.  I immediately thought of those sweet deer and houses in the Forrest Hills fabric.  I still want to add some more "life" to the mural, but for now I am happy to have the two deer.
Then, last week while looking for fabric additions to use in the nursery for the new baby, I stumbled on this cute Michael Miller fabric.  I think I am in love....again.  Or maybe I am just obsessed!  I am waiting to order it until I decide what to make, but maybe I should learn from the past and get a yard or so and see where it takes me.....and maybe I should add some of those trees to the landscape mural!


Friday, March 16, 2012

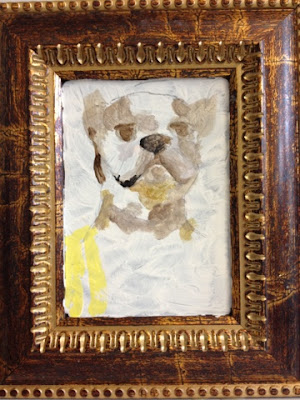
Pet Portraits!

OK, do PJ got his portrait and now apparently Buckley (our dog) wants a turn! Actually painting PJ's portrait made me think if how easy this sort of thing is for me. I fully admit that I use a projector to get started, but even that takes some skill. I can only get do much done that way (it is good for basic values, but NO detail). I always work best from a photo so I don't mind that half or more of my time is spent zooming in on a digital image while painting from observation. Anyway, PJ's portrait went FAST, like less than 2 hours, so I got to thinking about just doing pet portraits.... But with the same silly outfits. Flash forward about a month and I needed a donation for our church auction. I found a gold frame at a thrift store, covered the ugly image with gesso, and made a flyer explaining what I was offering. I got to thinking about it some more and I really wanted an example of my work painting a pet in costume, so today I put a coat of gesso on a different gold frame and worked for about an hour. You can see the progress below.

Monday, March 12, 2012

It's a.......

......perfectly healthy looking 18 and a half week old fetus! Ok, PJ and I do know a very specific fact about what sex it is, but we have vowed to keep silent until Easter. We always host a family dinner with Easter activities and have decided to use that moment for the big reveal! Until then, enjoy trying to guess from today's ultrasound images.
Exactly how many toes does that foot have?  I will have to count the fingers and toes when baby is born, for SURE!
Baby had a hand by it's mouth for most of the ultrasound.  Lydia never really sucked her thumb.  Maybe this baby is learning early!
 We ended up having Lydia with us for the ultrasound.  This was the Monday after the time change and I had a 7:30 appointment! (What was I thinking!?!)  And then, of course I woke up in the middle of the night and could't get back to sleep until about an hour before I needed to be up.....so we all woke up late and didn't have time to drop Lydia at preschool before the appointment. We didn't want Lydia to hear the gender because toddlers do NOT keep secrets!  So the ultrasound technician wrote the gender on a random ultrasound profile image for PJ and I to read the news.  Here is that image with my finger covering the word in question. 
And just so no one thinks my finger was hiding any obvious private parts, here is the same image with my finger to the side.  It's a totally random profile image, no gender clues other than the one the technician wrote on the screen. 

Thursday, March 8, 2012

A Boston (Terrier) Tea Party

 The Boston Terrier Rescue of East Tennessee ran this photo on their Facebook page with a description asking if anyone else had a similar photo.  Mine aren't vintage like the picture above, but I immediately shared some of the tea party pictures we took with Lydia and our Boston Terrier in preparation for her Alice in Wonderland themed birthday party.  I had so much fun looking through these old pictures, I wanted to share them in a single Boston themed post.
 I realized that several of these pictures never made it onto the blog because I needed time to edit them.  This ended up being one of my favorites.  I had to merge a few images together to get everyone facing the camera, but I love it!
 The rest of these are untouched candid shots.  I forget what Lydia was trying to feed Buckley and I am amazed at his patience!
 These next pictures were not staged.  Lydia was just playing with her tea set and eating crackers and Buckley wanted to join in the fun.
OK, this last one isn't a tea party or a real dog, but I couldn't resist sharing Lydia in her Boston Terrier hat and gloves. She was just big enough to wear them and not yet big enough to try and take them off!

Thursday, March 1, 2012

Lydia Love

I feel like it has been a while since the posts on "Liddy B and Me" have actually shown much of Miss Lydia.  So, today I am sharing some Lydia love.  
Lydia has been learning her letters and is very interested in putting them together to make words.  She knows how to spell her own name, and PJ's name is pretty easy, but I was so excited when she asked me how to spell LOVE while in the bathtub.  I didn't catch what was going on until I looked close at what she was writing. 
We have been playing outside a lot, and NOT in ANY form of snow this winter.  Lydia doesn't seem to mind one bit!