Monday, February 27, 2012

Chocolate Mustaches

This SHOULD be the final post on PJ's Mustache Themed 40th birthday party.  I had hoped to wrap it up MUCH sooner, but a nasty stomach virus hit our house and threw everything off kilter.  Once again, I think that we are recovered and at the moment I actually don't even have a cold!! (Whoo Hoo!)
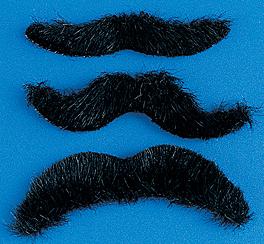
 I decided that I wanted to do a festive and edible party favor for the party and was SO excited to find these mustache molds online.  Below is a picture of what they should look like when finished.  
Unfortunately, my molds did not arrive on time, so I had to improvise.  Here is what I did.
Using the "chocolate transfer" technique, I placed a piece of clear overhead projector plastic on top of a mustache shaped pattern. ( I had just punched a ton of mustaches out of dark paper for my mustache straws, so I used the scrap pieces with the mustache shaped holes.) Next I melted chocolate in a plastic ziplock bag.  That way I could cut a small hole in a corner and control the melted chocolate like a piping bag.  I outlined the mustache and then filled it with chocolate. I didn't worry too much about the texture or the design looking like hair at this point (the far left shows this step). While the chocolate was still liquid, I set a sucker stick in the proper location.  I let it harden for a few minutes and then squeezed out a second layer of chocolate, covering the stick and making the mustache thicker in the middle.  Finally, I came back a few minutes later and added some zigzag lines to make the mustache look "hairy".
To display them, I decided to print the same image that I used on PJ's stickers, only on cover stock paper.  I cut them in a rectangle, laid the mustache under his nose, and slid the stick through a small hole near the bottom of the paper to keep it from moving around too much.  I slid the whole thing in a bag and tied it with a string.  The mustache pops were finished and so is this party post!

Tuesday, February 21, 2012

PJ's Portrait

I have been asking PJ for a while what he wanted for his 40th birthday and he always said the same thing.... a large gold framed oil painting of himself and our dog!  He is RIDICULOUS, but he was adamant that that was what he wanted. I googled "gentlemen portrait" to get some ideas and found this guy. (He actually looks a little like PJ with the beard and all)
Then I spotted this on a "framed art sale" for 2.99 at a thrift store. It was big and gold framed and the cardboard with the landscape printed on it was in good enough shape that I could paint directly on it, avoiding any issues of disassembling a frame.
To hide the landscape, and create instant (fake) oil paint texture, I brushed on a quick coat of gesso.  Gesso is super thick super sticky white paint that allows almost any surface to be painted. Here is the finished, textured and ready to paint surface.
Next, I cheated!  I photo shopped PJ's face onto the "gentleman's portrait" and projected it onto the frame using an LCD projector.  Within about 5 minutes, I had used this paint by numbers approach to get the skin and background started.
Here is the exact same step in the process, but with the projector turned ON so I could see the details that I needed to paint.  I would alternate between looking at the projection and standing in front of the projection so that I saw my work only.

After about an hour, I had done about all that I could with the projector.  I just couldn't see enough details that way, but this is how far I got. I also added our dog from a separate picture. I had to free hand the shape of PJs hand and I am still not happy with it.  I work MUCH better from a photo than from my imagination!
Now came the detail work.  I pulled up the reference pictures on my computer, zoomed in to the necessary level of detail, and painted away for a couple of hours.
Here is the finished portrait.   
 I think it is SO silly, but that is what PJ wanted.  I set it up on a wall at PJ's "mustache bash" surprise party and taped on a speech bubble saying "All HAIL the Birthday Boy!"
And now the painting is hanging at PJs shop, right next to all the random car parts and old bicycles.  Random and ridiculous, just like PJ!  Enjoy your gift, Old Man!

Sunday, February 19, 2012

40th Birthday Mustache Bash!

My husband turns 40 next weekend.  I have been working all week on throwing together fun stuff for a surprise "stash bash".  I have been itching to share what I was working on, but it was a surprise party, so I had to keep it under wraps until now. 
A friend hooked me up with a great (free) deal at a local sports bar, so they provided some appetizers and pool tables.  I couldn't really decorate a sports bar, but I wanted some sort of organizing theme.  After a short search on Pinterest, I decided a mustache theme would be fun.  PJ almost always has some type of facial hair and mustaches are masculine and trendy right now.  I did a quick evite.  Since they didn't have any mustache themed designs, I settled on a generic evite design that allowed for a photo upload.  I photo shopped a handlebar mustache over his normal mustache.  I borrowed some fun phrases, like "I mustache you to shave the date, and the invite was done!
This being and adult "guy" party I probably didn't need to do much more, but I couldn't help myself.  I decided to spread some party favors around our area of the bar to encourage guests to cut loose and have a good time.  I found these small Woolly Willy party favors and got a dozen.  A few friends were actually uploading pictures of their creations to face book, so I think they were a hit!
We HAD to have fake mustaches!  I found a really good deal on 3 dozen (WAY more than I needed but they were SO MUCH FUN!)  They got in the way of eating, so having extras was a good thing.
 Here are a few of the party goers enjoying the mustaches.
 And here is the birthday boy making sure that we didn't have too many extras at the end of the night.
In case anyone wasn't interested in wearing a stick on mustache,  I made some "straw stashes".  When you sip through the straw, the mustache was right in front of your upper lip.  Being at a bar, there were plenty of beverages being sipped!  
These were SUPER simple, considering that my Silhouette machine cut all the mustache shapes for me.  I just used a hole punch to make a hole mid-mustache and then inserted a bendable straw. (I didn't get a good photo of mine, so this one came from HGTV, but mine looked the same)
 My sister suggested doing something to let everyone at the bar know that it was PJs party, so I made these stickers.  I was surprised by all the new interesting Avery labels that were available. I thought this shape would be fun for adding a PJ photo an some clever phrasing.  I used the same image from the invitation, but turned it into a black and white outline using photo shop. (I found an easy tutorial here) There are a few other details that I crafted, but I am going to save them for a later post. I am fighting yet ANOTHER cold, so I "mustache" you to be patient with me!

Check out the chocolate mustaches from the party HERE.
Check out PJ's mustache portrait HERE

Monday, February 13, 2012

Valentine's Day Teacher Bouquet!

I bought a bunch of mini candy canes on after Christmas clearance figuring that I would make the candy cane chocolate hearts, like I did last year, for Lydia's school this year.  (Sorry, I could have SWORN that I did a full tutorial last time, so I didn't bother doing one this year.)  When I decided to make the 3D tootsie pop photo cards instead, I felt kind of bad about all those candy canes going to waste.  So I made a batch anyway and turned them into a bouquet of treats for Lydia's teachers.
I had a round paper tub from raisins that we recently finished, so I set it in the middle of a sheet of tissue paper.  I puled the tissue up to cover the raisin container and used a black ribbon to hold everything in place.  I had a couple small Whitman's Sampler boxes of chocolate, so I put two in the bottom of the container to weigh it down and then set two more on top of the first two so some are initially visible. (I would hate for the heart pops to get eaten and the chocolate boxes to get thrown away!)  Next I started sliding the chocolate candy cane heart pops in around the chocolate boxes.  The picture of the front doesn't look very full, but I think I got 7 or so pops and then 4 boxes of chocolate into the bouquet. (Lydia has 4 teachers and several after school helpers so their should be plenty to go around)
We used one of Lydia's 3D Valentines and just replaced the Tootsie Pop with a Candy Cane Chocolate Heart Pop so everything matches, but her name is on her gift.
Here is the view from the back, showing a better view of all of the goodies.  Hopefully Lydia's teacher's and helpers enjoy the treats!

Saturday, February 11, 2012

Valentine's Day Cards

 So, this 3D Valentine has been bouncing around the blog world for a while and I am certain that with the advent of Pinterest, even more moms are opting for this simple semi-homemade Valentine's Day card.  I have no idea who came up with it initially but I did find a good tutorial here.  I half expect to show up with Lydia's cards, only to discover that EVERYONE else saw the same idea (thanks again, Pinterest)!  Oh well!  I was happy to realize that even with one hour developing, I was around $10 for the 60 photos I needed (Lydia's school is combining classes for a super HUGE party).  I could have saved some cash, but I would have needed to plan ahead and that just wasn't happening this month!
Step one: I selected a day when Lydia was not covered in dirt after school and asked her to pose for me.  Thankfully she cooperated with the whole "hold your arm up, now put your hand like this, now look at me, now smile" directions, for about 5 minutes.  I only got 5 quick photos before she lost interest and this is the best one in terms of hand position and smile.  It is not ideal in terms of layout because the hand is too close to the edge of the picture.
Enter Photoshop!  I planned on using PS to add the text, but I also bumped up the saturation of the colors a little and cut the extra grass from the right side of the picture and moved it to the left side of the picture.  I added a pink box and wrote a Valentine's message.  Hopefully this gets me out of asking Lydia to sign her name to 60 cards!
I punched holes just above and just below Lydia's fist.  I then inserted the Tootsie Pop sucker and I was finished! (well, OK..... I repeated those last two steps SIXTY times and THEN I was finished!)  I am SO happy with Lydia's adorable 3D Tootsie Pop Valentine's Day cards.  Here's hoping her little friends enjoy them too.

Friday, February 10, 2012

Valentine Voodoo Doll!

I saw this tutorial on Martha Stewart for making a skeleton out of a pair of white socks.  I must have seen it around Valentine's Day last year.  I thought it was cute, but following the directions and just making a skeleton seemed a little too simple!  If you have seen my Valentine's Day cards, then you know that I like the dark and sarcastic side of the holiday.  I decided to add a few details to turn Martha's Sock Skeleton into a Valentine's Day Voodoo Doll!
You can find the official Martha Stewart template and tutorial here, or you can follow along with my pictures.
First, you get two basic white athletic style socks
Cut the ankle ribbed part off of one sock.
Cut the one ankle ribbed part in half.  These will become the arms.
Lay the other sock so that the heel part is visable.  You are going to cut this socks ribbed ankle part in half lengthways.  These will be the legs and the heal will be the skeleton's rear end, so check to be sure that the legs are going to be in the middle of the rear end before you cut.
Here are the basic pieces lined up in their approximate locations.  Unfortunately this is also where I got either too sick or too busy to document the rest of the progress.  In a nut shell, I sewed each of the arms and each of the legs to create a tube.  I stuffed the doll through the open ends of each arm and leg tube.  To make it a little easier, you probably want to stuff the body BEFORE you sew up the legs.  Last, I sewed the hands and the feet shut.  I sewed a gathering stitch where the neck should be.  At that point I switched to black thread and sewed the button eyes, the skeleton smile, and a few lines for ribs.
At this point it is pretty close to the Martha Stewart version.  I added some nice quilting pins to turn it into a voodoo doll.
To turn it into a Valentine's Day Voodoo Doll, I cut out a small felt heart and slid it under the rib threads.  I just didn't think the skeleton was swanky enough, so I made him a little stove pipe hat to complete the look.

Tuesday, February 7, 2012

A Circus Celebration

Here's hoping that no one minds one more crafting post about things that I actually am not crafting at the moment.   I PROMISE that I am FINALLY (after 4 weeks of a killer cold and 4 previous weeks of early pregnancy nausea) feeling better and getting going again.  You can imagine after so long that I have a ton of mundane chores to catch up on, but there are already a few projects in the works.  Unfortunately, everything that I am working on right now are gifts for people so I have to wait to share them.  For the time being, dreaming about and planning stuff for the new baby makes me very aware that I was not blogging while dreaming about and planning stuff for Lydia.  I want her to know all the things that were made and arranged for her before she (and this blog) were born.  First on the list was Lydia's Circus Celebration.
 I was blessed with multiple groups of friends who through amazing baby showers.  But when your art teacher friends get together to plan a circus themed party because they know that you are designing a circus themed nursery, the results are bound to be a lot of fun.  These were a few ideas that we bounced around for the invitation.
 I knew about the invitations, but was surprised by just about everything else at the party.  They used popcorn boxes for flower vases.  They chose yellow flowers to replicate the feeling of popcorn.  There were printed pennants that said our names attached to sticks with foil streamers and balloons.
 The cake was made to look like a tent and there are more popcorn boxes filled with food. 
 The art teachers got the graphic design teacher to make a circus poster with our picture on it.
 There were circus stuffed animals used as decorations, that were given to me after the party to add to Lydia's nursery.  I was given a feather boa to wear instead of a corsage.  I am sure that I said thank you to my friends who planned the party, but now I am very excited to blog about their amazing skills and even more amazing friendship!

Monday, February 6, 2012

Ultrasound Update and Party Planning!

So my thirteen week ultra sound was last week. The doctor saw what was needed to rule out the major scary things that doctors look for on an ultrasound.
Unfortunately for me, we didn't see much else. Baby B. (for Burchett) was facing my back, so all we saw was its back. No cute profile picture like I got with Lydia at 13 weeks (see the profile of Lydia with her hand by her face from 2008 to stir up a little in-utero sibling rivalry!)
There was also no suggestion of the gender because, whatever that is, it was also facing my back. I don't mind that last part because if they had seen it this early, I would have known that it was probably a boy and that would have taken some of the fun out of any gender reveal. So, at my next ultrasound, around 20 weeks, the gender should be visible regardless of what gender it is. My idea is to take an envelope along and have the doctor write the gender and seal it up for us. Then I want to have a gender reveal party where we all find out together! Here are the details that are forming in my head.
I saw this invite on Pinterest and I was in love! I already have a thing for bees (Mrs. B. and all) so I love this gender neutral theme. I'm not sure that I would bother with an invite, since it would just be family, but I do like this simple graphic.
Maybe I can make some cards with a similar design for guests to write their gender guesses. Mostly I want to coordinate a few decorations and some fun foods. If the timing is right, we are already having the family over for our annual Easter dinner. We revealed Lydia's gender at Easter, so it's kind of tradition. We already serve "Honey Baked" ham, so a bee themed desert selection could be cute and fitting at a spring event.
I'm thinking of all sorts of fun yellow and black/brown foods, like Twinkies, moon-pies, honeycomb cereal, lemon bars, yellow and black jelly beans, marshmallows with yellow sprinkles. That is probably WAY more food than I need, but fun to think of the possibilities, especially because so many don't require ME to make them!
I am kind of dying to try making these jelly bean almond bees that I found on Pinterest (more details here).  I haven't looked up the step by step directions yet, but it looks like a black jelly bean with some dark chocolate piped on for a head and a stinger.  Then some yellow chocolate stripes and two slivered almond wings.  I think these would look GREAT on lemon bars and maybe on a few cookies.  I think I would want to scatter them EVERYWHERE! 
For decorations, I am sort of obsessed with this beehive piñata. It shouldn't be too hard to make, since it IS the shape of a balloon!  I am toying with this pinata being the way we all find out the news. Here is my plan: I could make the piñata ahead of time and just not fill it myself. I could then have two different bags of confetti, one in pink and one in blue. Here is the tricky part. I need a semi-crafty and extremely discrete helper to open the envelope from the doctor and fill the piñata with the appropriate gender filling. The helper would need to not be close family who would be at the reveal. However, they would need to live near my house because I don't want to risk any extra time between the piñata being filled and the party happening. I think I would just want to deliver it the night before the party and pick it up the day of, preferably only a short time before the party. I don't trust the information being out there for long and I do NOT trust myself alone with only a paper mâché beehive standing between me and shopping for baby clothing. So that's my idea.  You can try to tell me that I am crazy, but I will just refer you to the sign below!